
Those who invest a lot of time and love in their home know the problem: The lawn is freshly mown, the flowers are blooming, and the facade is radiant. But right next to the driveway, bright yellow, blue, brown, and black plastic bins stand out and disrupt the harmonious overall impression. A high-quality privacy screen for trash cans is the perfect solution to elegantly solve this aesthetic problem.
In addition to pure aesthetics, smart waste bin enclosures offer many other advantages, from odor reduction in summer to protection against pests. In this comprehensive guide, you'll learn everything you need to know about selection, planning, and installation so that your trash cans stylishly disappear from view.
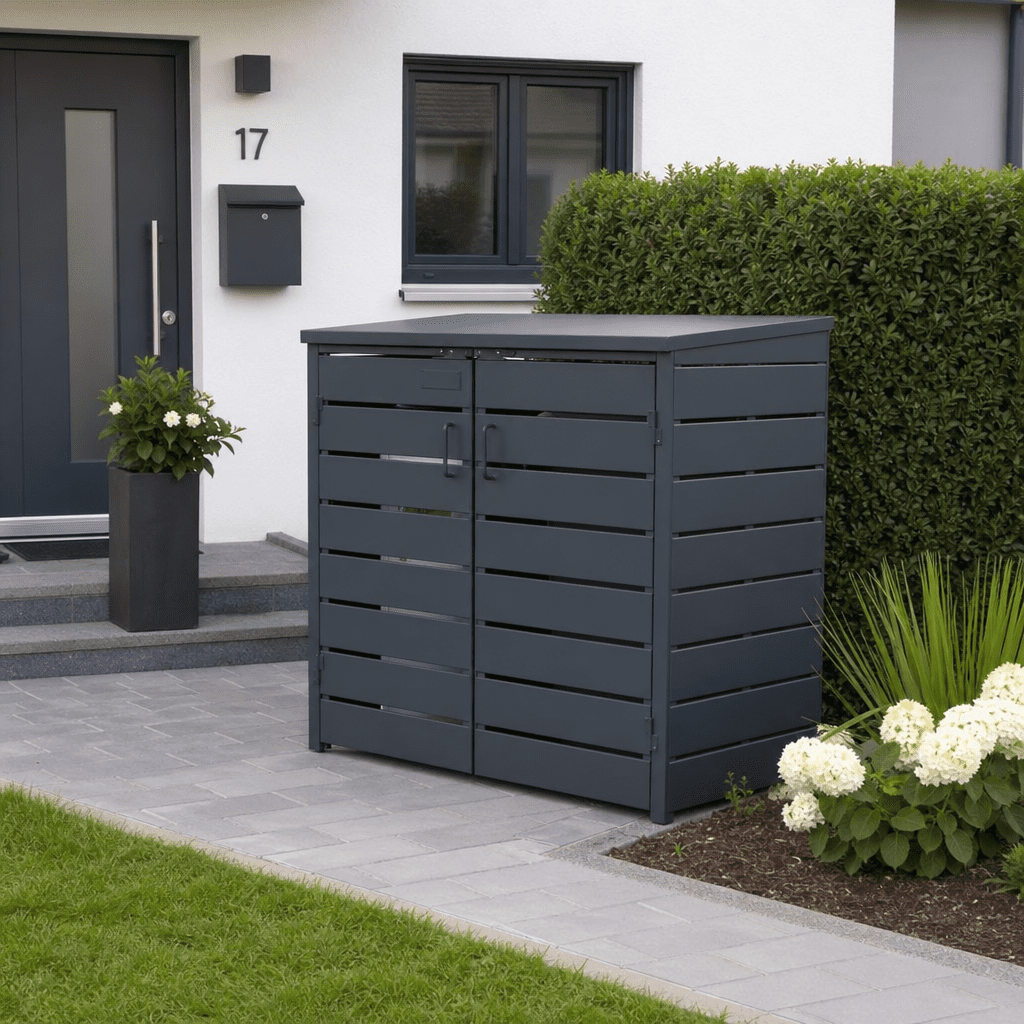
Why a privacy screen for trash cans is essential
A trash can enclosure is about much more than just aesthetics. When planning your entrance area or front garden, functional aspects should also be taken into account:
- Optical enhancement No matter how much effort you put into a beautiful garden screen, open cisterns often ruin the positive impression. An elegant cladding integrates seamlessly into the architecture of your home.
- Odor prevention In the height of summer, conditions inside the bins can quickly become uncomfortable. A good shelter provides heat protection for trash cans by blocking direct sunlight, thereby slowing down the decomposition processes inside.
- Protection from animals and the weather A weather-resistant trash can cover protects the bins from strong winds that could knock them over and keeps curious animals like raccoons or rats away.
- Order and Cleanliness A designated spot provides structure. Nothing is left lying around haphazardly anymore.
Making trash cans in the front yard appealing: the best ideas
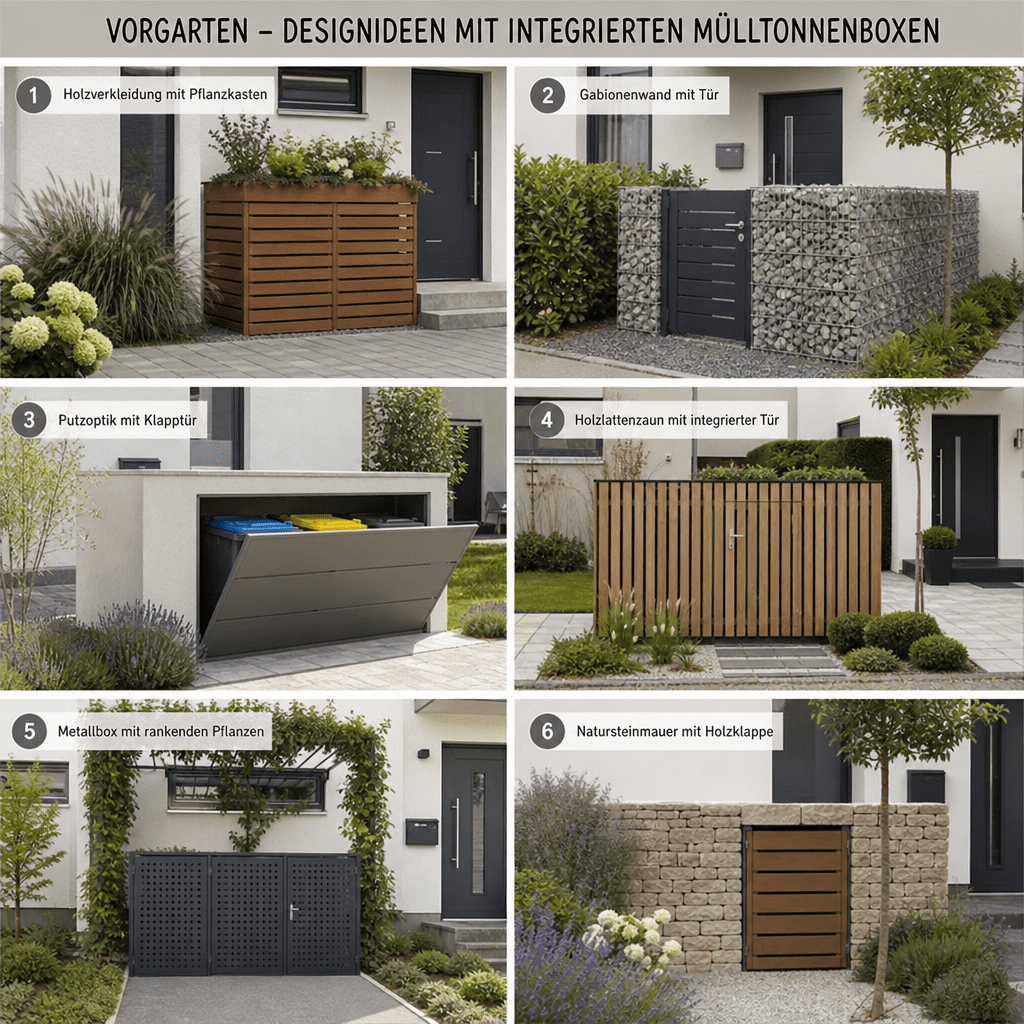
The challenge often lies in making the best use of the limited space in front of the house. If you want to make trash cans appealing in the front yard, you should view the privacy screen not as a necessary evil, but as a design element.
Match the design of the trash can enclosure to your existing garden privacy screens, fences, or the color of your front door. For example, you can combine the enclosure with trellises and let climbing plants like clematis or ivy grow up the sides. Placement also plays a role: Hidden behind a half-height hedge or elegantly nestled against the house wall, the shelter is barely noticeable as such.
Material Comparison for Trash Can Separation: What's Right for You?
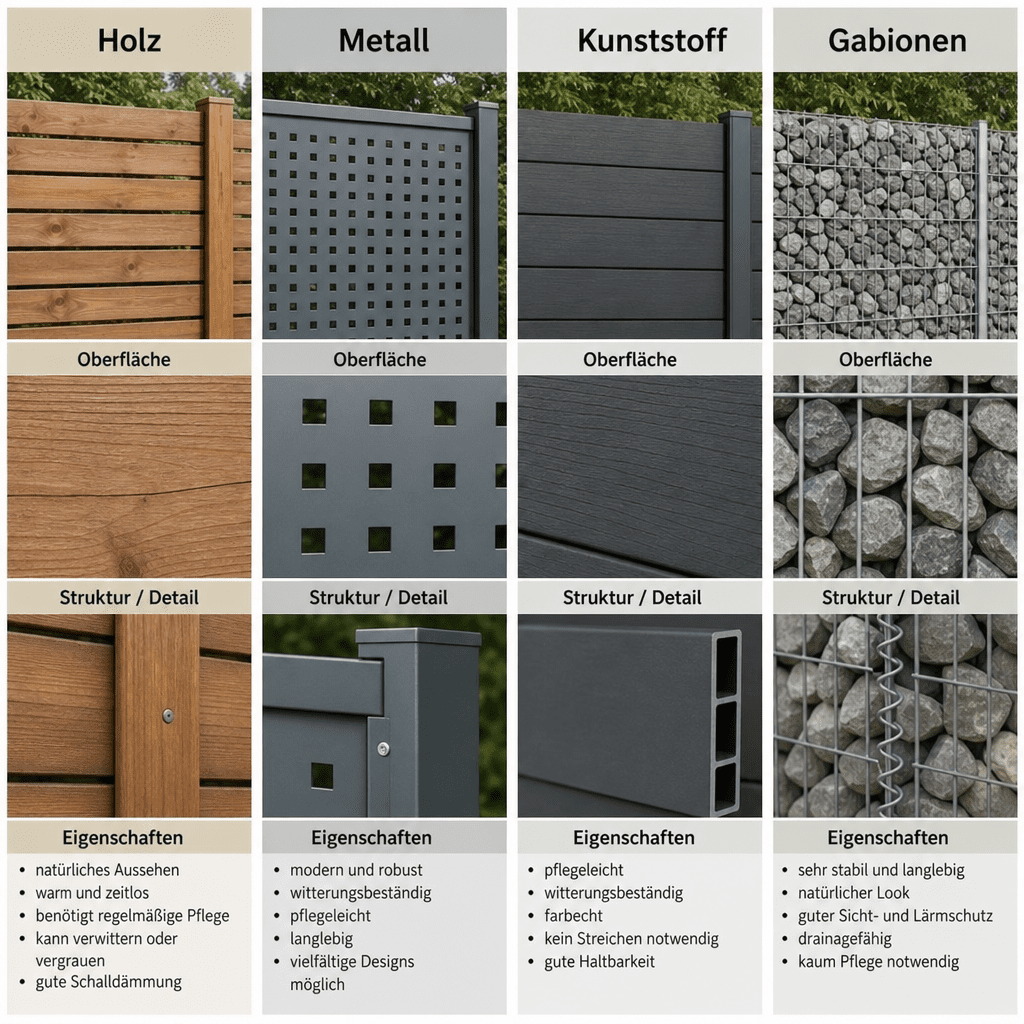
These days, there’s a huge variety of materials to choose from. Each material has its own specific pros and cons in terms of durability, maintenance, and price. Here’s a detailed comparison of materials for trash can enclosures to help you make your decision.
1. Wooden trash can surround
Wood is the classic garden material. A wooden trash can enclosure exudes naturalness and warmth. Woods like larch, Douglas fir, or treated spruce are often used.
- Advantages: Natural look, fits into almost any garden, relatively low purchase price, sustainable.
- Disadvantages: It requires regular maintenance (painting or oiling), otherwise it will weather.
2. Stainless steel and aluminum trash bin shelter
If you prefer a modern, minimalist look, go with metal. A stainless steel trash can shelter is the epitome of elegance and durability.
- Advantages: Completely rust-free, extremely durable, very elegant design, easy to clean.
- Disadvantages: High purchase price; may get warm when exposed to direct sunlight (make sure there are sufficient ventilation slots).
3. Low-maintenance plastic trash can surround
For budget-conscious homeowners who want to spend as little time as possible on maintenance, a low-maintenance plastic trash can surround is the ideal choice. High-quality plastic in anthracite or a wood-grain finish looks very attractive these days.
- Advantages: Very lightweight material, rust-resistant, no painting required, often easy to assemble using a snap-together system, very budget-friendly.
- Disadvantages: May become brittle in extremely cold weather; its lightweight construction requires secure anchoring in the ground.
4. Gabion Trash Can Enclosure
Gabions—wire baskets filled with stones—are all the rage right now. A gabion trash can enclosure is extremely sturdy and features an interesting texture.
- Advantages: Indestructible, excellent sound and heat insulation, no maintenance required.
- Disadvantages: Very heavy; requires a strong foundation; construction involves physical labor (filling with stones).
Popular Models and Practical Features
When choosing the right solution, it's not just the material that matters, but also the size and ease of use.
A standard feature in many single-family homes is the Set of 3 240-liter trash can enclosures. It offers enough space for standard 240-liter general waste, organic waste, and paper bins. If you also have a yellow bin, this system can easily be expanded to a 4-bin unit.
To make sure your daily life remains comfortable, you should look for smart features:
- Trash can cabinet with gas spring: Nothing is more annoying than having to hold the lid of the trash can enclosure open with your hands full. A trash can enclosure with a gas spring gently lifts the lid upward and holds it open on its own. Often, the lids of the enclosure and the trash can are connected by a chain, so that both open at the same time.
- Trash can shelter with a green roof: A real asset to the microclimate! A trash can enclosure with a green roof features a built-in planter on the roof that you can fill with low-maintenance sedum varieties, stonecrops, or low-growing herbs. Not only does this look beautiful from above, but it also provides food for insects and helps cool the interior of the enclosure even further in the summer.
Preparation and Setup: How to Make Your Project a Success
Before you order your new shed or buy materials at the home improvement store, there are a few preparatory steps to take. Two important aspects are often overlooked: the foundation and the legal requirements.
The Legal Side: Building Permit for a Trash Can Shelter
In most cases, you do not need special permission for standard cladding. However, there can be regional differences. A building permit for a trash can enclosure may be required if the construction exceeds certain dimensions (e.g., a height of 2 meters), is located directly on the property line, or is considered a solid brick structure. It is advisable to briefly check the local building code or inquire with the responsible building authority before starting construction to be on the safe side.
The Right Base: Laying the Foundation for a Trash Can Enclosure
A privacy screen for trash cans—especially models made of stainless steel or gabions—is quite heavy on its own. In addition, the heavy cans are rolled across the ground every day. Soft soil can quickly cause the enclosure to sink. It is essential that you build a sturdy foundation for the trash can enclosure.
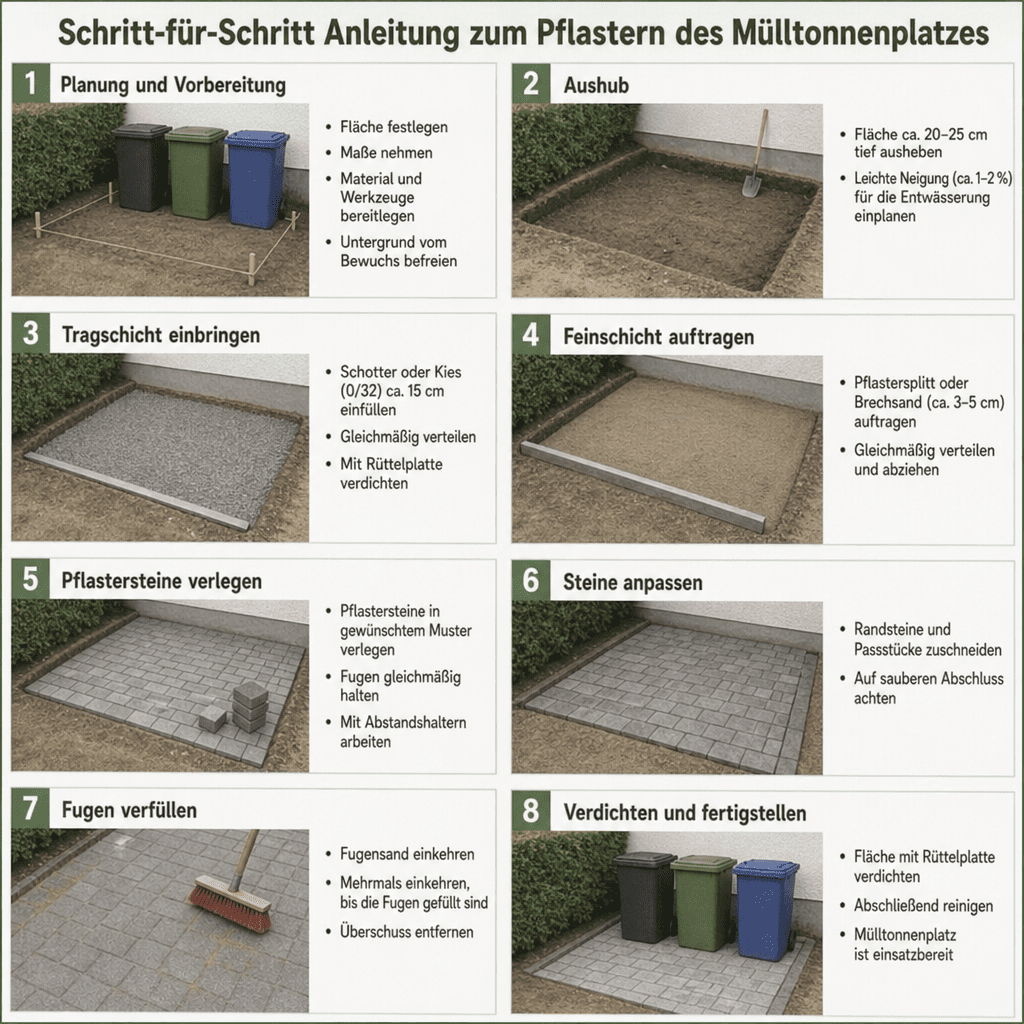
A paved surface or a poured concrete foundation is best. If you want to prepare the space yourself, this compact Paving a trash bin area guide:
- Excavate the ground Mark the area (add about 10-15 cm buffer on all sides) and excavate the soil to a depth of about 25 to 30 cm.
- Create a layer of gravel Fill in approximately 15 cm of coarse gravel or mineral mix. Compact this layer thoroughly with a vibrating plate or a tamper. This protects against frost damage.
- Laying sand/grit Apply a layer of paving gravel about 4–5 cm thick and use a straightedge to level it exactly horizontally (or with a 1–2 % slope away from the house).
- Laying paving stones Now lay the paving stones or washed concrete slabs in the desired pattern. Lightly tap the stones firm with a rubber mallet.
- Grouting Insert fine joint sand or quartz sand into the joints until everything is firm.
DIY Project: Build Your Own Trash Can Screen
For DIY-savvy gardeners looking for a custom solution, building it yourself is a great option. If you build your own trash can screen, you can tailor the dimensions, materials, and design 100 % to your needs.
A simple idea with wooden slats:
- Installing Post Holders Embed H-post anchors into your prepared foundation to protect the wooden beams from rising damp.
- Erecting the framework: Screw impregnated square timbers (e.g., 9x9 cm) as a supporting frame.
- Install paneling: Use rhombus strips made of larch wood. These are screwed horizontally to the substructure with a slight gap between them. This creates a modern, airy look while guaranteeing good ventilation of the box.
- Install doors Construct simple frames for the doors, clad them with the slats, and attach them to the basic framework with sturdy cross hinges. A simple latch keeps the doors securely closed.
- Roof A simple shed roof made of weather-resistant OSB panels, clad with bitumen shingles or an EPDM membrane, protects the wood from above.
Pro Tip: When building it yourself, be sure to allow enough clearance for pulling out the barrels. The box should be about 10 cm wider and deeper than the barrels themselves.
Conclusion
A well-thought-out privacy screen for trash cans is an investment that pays off every day. It greatly enhances the appearance of your home, protects the bins from the elements, and minimizes unpleasant odors.
Whether you opt for a decorative trash can enclosure with a green roof, a robust stainless steel version, a low-maintenance plastic solution, or a DIY wooden project – it's important that the model suits your lifestyle and local conditions. With a solid foundation and a little planning beforehand, you can create a tidy and inviting front yard where trash cans are no longer an eyesore.
